Roblox - Player And Character
- Brendon Ross

- Apr 9, 2019
- 4 min read
Updated: Feb 26, 2021

For developers Roblox games are all about the player. What can the player do? Where is the player? Is the player dead? And the list goes on. If you are just beginning your journey into scripting in Roblox Studio you will quickly find that the “player” is represented in different ways, and contains many parts. It can get a bit confusing at times, so I wrote this article in hopes of making it easier to understand.
The “Player”
What exactly is the player? The Player a representation of you in the Roblox game world. Imagine going to a costume party dressed up so nobody could tell who you were. As you enter the door to the party someone sticks a name on you (your username, not your real name ) and while at the party everybody refers to you by your name badge.
Adding a Player to your game
So you have saved your baseplate template named “Greatest Game Ever!” and now you want to have all your friends come and look at your game. How do we add them to our game?
Create a script in the Workspace. (Not a LocalScript - they are handled differently), and type the following lines of code.
game . Players . PlayerAdded : Connect ( function ( player )
print ( player )
end)
If you Save, Publish, and Play the game you will see your username print in the Output Window. Easy so far.
What is a Player?
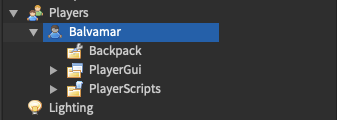
Now we know we are added to the game let’s look at how we are represented. In the image below you can see that under “Players” in the Explorer Window I can see my username, however in the “Workspace”, I am also there. So what is the difference. Let’s look closer at each one.

Players
You can see if you expand your username under “Players” you find some folders. This is all the game information that is attached to me. If you look in the Properties Window you will see all the details about you as a player including your UserId, and other personal information I’m not putting in an image here ;)

Character
If you expand your username in the Workspace you will find it has a long list of all the parts represent you in the game world. This is referred to as the Player.Character.
Why is there 2 ways to represent the player?
The Player object holds personal and account information, where as the Character ( which is a representation of you as a player ) allows you as a coder to access all its properties and manipulate them in the game.
How do I get the Character?
After the player is added to the game using the code above the character is added. We can write the following code to access our character properties.
game . Players . PlayerAdded : Connect ( function ( player )
player . CharacterAdded : Connect ( function ( character )
print ( character )
end ) -- end character added
end ) -- end player added
Once again you will see your username prints to the Output Window.
Looking Inside Each One
To look at what the “Player” and the “Character” are made up of we need to loop through the Player Object and the Character Object. Each Object is the Parent to the items it contains, which are referred to as its Children. To look at all the children of an object we need to create a variable that gets all the children together. Add the following line of code below your print ( character ) statement.
local childrenInCharacter = character : GetChildren ( )
Now that we have an object to look at we can use a for loop to print out each of the children to the Output Window. Add the following code to see the Characters children.
for i , eachChild in pairs ( childrenInCharacter ) do
print ( i , eachChild )
end
Now Save, Publish and Play. You will see a big long list of all the children of the Character Object. How is this useful? Well, you will notice a number next to each of the Character Properties. This shows the value of “ i ” in our loop. So when i = 1 we can do something with the HumanoidRootPart of the Character. When i = 2 we can do something with the LeftHand, until we get to the end of the list.
What can I do with the player?
When a game starts and a player is being added it gives you the opportunity to do things such as set up a leaderboard folder for them, or add custom properties to each player. Let’s add a property to each player that lets us greet each player in a different way depending on whether they are a friend or not.
game . Players . PlayerAdded : Connect ( function ( player )
local myFriend = Instance . new ( “BoolValue" )
myFriend . Name = “ IsMyFriend "
myFriend . Value = true
myFriend . Parent = player
player . CharacterAdded : Connect ( function ( character )
In this code we create a new Boolean variable ( true or false ). We give it the name “ IsMyFriend ”. This is how we will refer to it. We then set it’s value to true, meaning each player will be our friend. And lastly we parent the value to the current player. Which means “ attach it to the player”
Now you have done that, what can we do with it?
Change the player. CharacterAdded function to look like the code below.

Save, Publish, and Play! If the value of “ IsMyFriend ” is true then the first print statement will show in the Output Window. If you change it to false, then save, publish and play you will see the second print statement in the Output Window.
Notice that as we are inside the CharacterAdded function in order for us to get the characters “ Player ” information we need to find it in “ Players ”. Then we need to find the “ IsMyFriend ” variable inside the player.
Hopefully this article has helped you understand a little better about what a Player and a Character is, and how to access the properties of each. Keep practicing and coding!


Comments